How to Read & Create Floor Plans, Elevations, and Sections: A Guide for Interior Designers
In interior design, technical drawings are the foundation of every successful project. Whether you’re designing a home, office, or commercial space, understanding how to read and create floor plans, elevations, and sectionsensures accuracy, efficiency, and clear communication with clients, contractors, and vendors.
This guide will help you master the basics of these essential drawings.
1. Understanding Floor Plans: The Blueprint of a Space
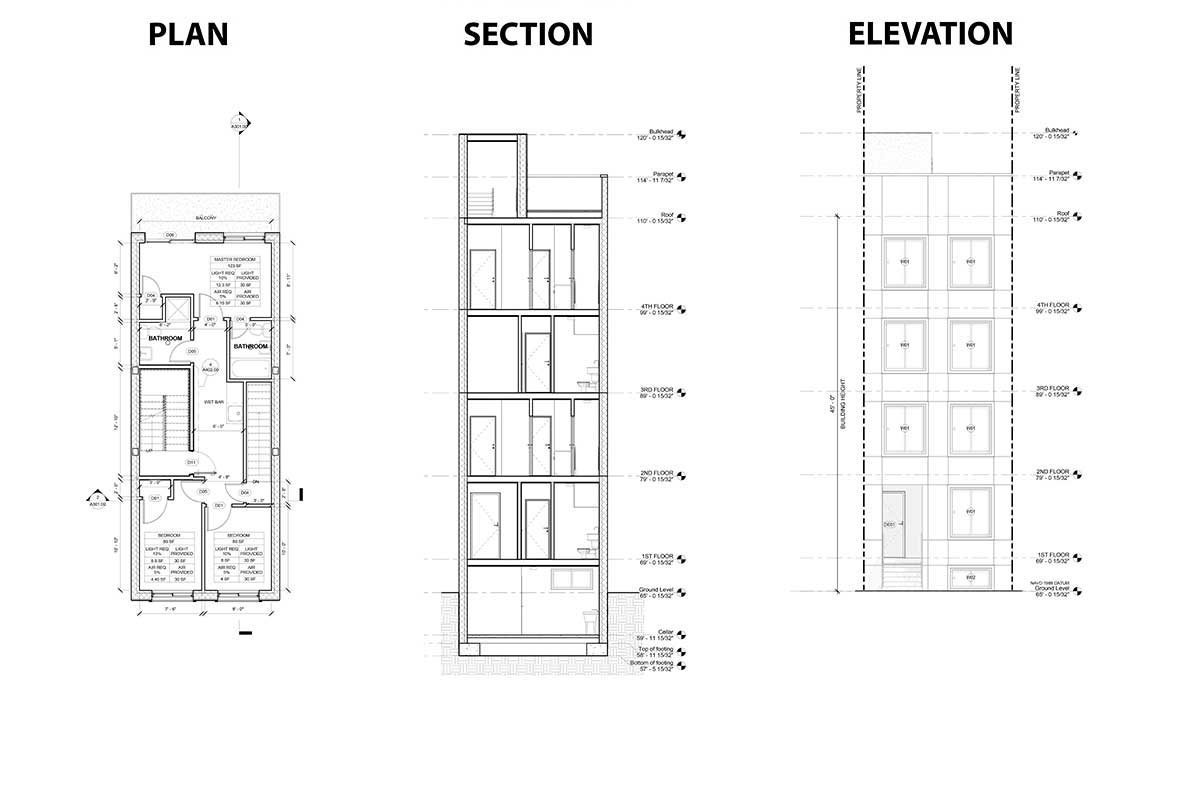
A floor plan is a bird’s-eye view of a space, showing the layout of walls, doors, windows, and furniture. It provides a scaled representation of how different elements fit together in a room or building.
How to Read a Floor Plan:
✔️ Scale & Dimensions – Check the scale (e.g., 1:50 or 1/4” = 1’-0”) to understand actual room sizes.
✔️ Walls & Openings – Solid lines indicate walls, while breaks or arcs show doors and windows.
✔️ Symbols & Annotations – Look for electrical outlets, plumbing points, and furniture placements marked on the plan.
How to Create a Floor Plan:
✔️ Start with Site Measurements – Use a laser meter or measuring tape to get accurate room dimensions.
✔️ Define Zones & Flow – Allocate spaces for living, working, or storage and ensure a natural circulation path.
✔️ Use CAD Software – Tools like AutoCAD, SketchUp, or Revit help create precise, editable floor plans.
📌 Pro Tip: Always consider furniture placement while drafting a floor plan to ensure proper space utilization.

2. Elevations: The Vertical Perspective
While a floor plan shows a top-down view, an elevation is a flat, vertical representation of a wall or facade. It helps visualize heights, materials, and finishes.
How to Read an Elevation Drawing:
✔️ Wall Heights & Levels – Elevations show floor-to-ceiling heights, window sill levels, and cornice details.
✔️ Surface Treatments – Look for textures, materials, and finishes applied to walls, cabinets, and built-in units.
✔️ Door & Window Placement – Elevations provide accurate positions of openings, ensuring alignment with the design.
How to Create an Elevation:
✔️ Define the View – Decide which wall or side of the room needs to be detailed.
✔️ Add Key Features – Include windows, doors, shelving, lighting fixtures, and wall treatments.
✔️ Dimension Everything – Clearly indicate heights and distances for contractors to follow accurately.

📌 Pro Tip: Use dashed lines to show hidden elements like cabinet depths or ceiling beams in an elevation.
3. Sections: The Cross-Sectional View
A section drawing cuts through a structure to show internal details that aren’t visible in floor plans or elevations. This helps in understanding wall thickness, structural components, and hidden installations.
How to Read a Section Drawing:
✔️ Wall Layers & Materials – Sections reveal brickwork, insulation, and finishes used inside walls.
✔️ Floor & Ceiling Heights – These drawings confirm slab thickness, false ceiling heights, and step levels.
✔️ Furniture & Fixtures in Context – Sections help visualize how cabinets, stairs, and lighting fit within a space.
How to Create a Section Drawing:
✔️ Choose the Cut Line – Define where the imaginary slice-through occurs to best reveal internal details.
✔️ Detail Construction Elements – Show floor structures, insulation, and plumbing ducts in the section.
✔️ Label & Dimension Properly – Ensure all elements are clearly marked for contractors to follow.
📌 Pro Tip: Always cross-check sections with floor plans and elevations to avoid discrepancies.

Final Thoughts
Mastering floor plans, elevations, and sections is essential for every interior designer. These drawings bridge the gap between concept and execution, ensuring designs are functional, aesthetic, and buildable.
What’s your biggest challenge when working with technical drawings? Let’s discuss in the comments! 👇✨
